1. What are your feelings on cilantro?? I like it, as long as it's chopped pretty finely. Apparently though, some people really HATE it. Like Julia Child. Who knew?? Read all about it here. (Via NY Times)
2. Seems the 1940s housewife needed some help. Thankfully this helpful video was produced to teach us all how to stir and boil. (Via Bon Appetit daily)
3. For all your Orlando-ians, The Pioneer Woman is coming to town next month! If you haven't heard of her, take a day off work and read her Black Heels to Tractor Wheels love story. It's so romantic, it'll make you cry. And it's being turned into a movie! (Via The Pioneer Woman)
4. I LOVE Disney. (Almost as much as those cilantro-haters hate cilantro.) This week, Bakerella posted Disney-shaped cake-pops. I ALMOST DIED. (Bakerella also has tons of other truly adorable desserts--check out the burger & fries for Father's Day!) (Via Bakerella)
5. Poll: Is this refrigerator message creepy or adorable??? (Via Bon Appetit daily)
Wednesday, April 14, 2010
Tuesday, April 13, 2010
Hiatus!
I will be on a brief hiatus while I work out some personal issues and finish up grad school.
See you all soon!!
See you all soon!!
Friday, April 9, 2010
Friday Happy Hour: Jalapeno-Cucumber Margarita
TGIF!! And TG I only have a week left of my MBA!

Ryan and I have EPCOT After-4 passes and so often we go and hang out at the World Showcase on the weekends. They recently opened a Tequila Bar in Mexico, and that's always our first stop. The bar has all sorts of specialty margaritas but Ryan loves their jalapeno-cucumber margarita. So I decided to recreate it for him at home.
Jalapeno-Cucumber Margarita
jalapeno slices
cucumber chunks
2 teaspoon sugar
1 1/2 ounce tequila
1/2 ounce grand marnier
1/2 ounce triple sec
juice of one lime
juice of 1/4 orange
First, in the bottom of your shaker, put the cucumber slices (add more if you want it cooler), jalapeno slices (add more if you want it hotter), and sugar. Using a pestel (or wooden spoon if you don't have a mortar & pestel set--Ryan bought us one awhile back and we NEVER use it... except for this), muddle (that means smush) together the jalapeno, cucumber and sugar until you get a paste. If you want it even spicier, make sure all the jalapenos are crushed really well. If you leave them partially whole, all their spiciness won't come out. Add in the booze, juices and some ice. Shake well, and pour into a rimmed margarita glass (I forgot to rim my glass first, oops!).
 Hope it's not too spicy for you!

Ryan and I have EPCOT After-4 passes and so often we go and hang out at the World Showcase on the weekends. They recently opened a Tequila Bar in Mexico, and that's always our first stop. The bar has all sorts of specialty margaritas but Ryan loves their jalapeno-cucumber margarita. So I decided to recreate it for him at home.
Jalapeno-Cucumber Margarita
jalapeno slices
cucumber chunks
2 teaspoon sugar
1 1/2 ounce tequila
1/2 ounce grand marnier
1/2 ounce triple sec
juice of one lime
juice of 1/4 orange
First, in the bottom of your shaker, put the cucumber slices (add more if you want it cooler), jalapeno slices (add more if you want it hotter), and sugar. Using a pestel (or wooden spoon if you don't have a mortar & pestel set--Ryan bought us one awhile back and we NEVER use it... except for this), muddle (that means smush) together the jalapeno, cucumber and sugar until you get a paste. If you want it even spicier, make sure all the jalapenos are crushed really well. If you leave them partially whole, all their spiciness won't come out. Add in the booze, juices and some ice. Shake well, and pour into a rimmed margarita glass (I forgot to rim my glass first, oops!).

Wednesday, April 7, 2010
Lamb Kebabs with Raita (Yogurt Sauce)

My ex, Rajit's mom used to make lamb kebabs for us all the time, and they were so yummy. So, in my book there was a recipe for lamb kebabs and I made them last Friday night for Claire & Ryan. Claire (a true Swede at heart) thought these were spicy, but Ryan and I couldn't even taste the spice.
Lamb Kebabs
2 pounds lean ground lamb (yes, you can get this at Publix!)
1 large onion, roughly chopped
2 inch piece fresh ginger, roughly chopped
2 garlic cloves, peeled
1 fresh green chile, roughly chopped (I used a jalapeno, but Rajit says it was probably supposed to be a little Thai chile)
1 teaspoon chili powder
2 tablespoons chopped cilantro
1 teaspoon garam masala (get this and the other spices at an ethnic grocery store)
2 teaspoons coriander powder
1 teaspoon ground cumin
1 teaspoon salt
1 egg
Mix everything except the lamb in a food processor until a paste forms.

Take the mixture out and place in a mixing bowl and mix in the lamb until just mixed. Cover and let marinate for at least an hour.
In the mean time, make the raita. Take a cup plain yogurt and mix with 1/2 cucumber finely chopped, 2 tablespoons fresh chopped mint, 1/4 teaspoon salt and a squeeze or two of lemon. (I forgot to take a picture of the raita! My bad!)
Next, take the meat mixture out of the fridge, and get some kebab sticks ready. Form the kebabs. Claire helped me out and we made ours about 5" long and 1 1/2" wide. We basically formed them in our hands, then stuck in the kebab stick and finished forming the meat around it. I baked them on a half sheet pan lined with foil. It was a little challenging to turn them over, but definitely make the attempt so all the sides get crispy.

The recipe says to brush the kebabs with a mixture of a little bit of yogurt and oil before baking, but I'm not sure how that impacted the final product. Just skip it if you want!
Broil these for 8-10 minutes, or until brown all over. The recipe also says to turn them during the broiling, but when I tried to turn on, the kebab stick came out. However, once they were cooked all the way through, I could lift them with the kebab.

I served these with the raita and some homemade garlic cilantro naan (post coming soon!). The 2 pounds of lamb made about 12 kebabs. And these were SO good!! Try them out--they're not as complicated as they seem, promise.
Tuesday, April 6, 2010
Banana Cupcakes with Peanut Butter Frosting

Banana Cupcakes
(This makes 12, and they'll go super fast, so maybe make a double batch!)
1 1/4 cups all purpose flour
1 1/2 teaspoons baking powder
1/2 teaspoon baking soda
1/4 teaspoon salt
2 very ripe large bananas, peeled
1/2 cup sour cream
1 1/2 teaspoons vanilla extract
3/4 cup sugar
1/2 cup (1 stick) unsalted butter, room temperature
1 large egg
1 large egg yolk
First, smush the bananas with a fork in a bowl.

Add in the sour cream and vanilla and mix.

In another bowl, mix the flour, baking power, baking soda and salt. With your mixer, cream the butter and sugar until fluffy. Add in the egg and egg yolk and mix well.

Now in the recipe it says to mix in the banana mixture and the flour mixture alternately in three mix-ins each. I don't have time for that in my life, so I added all the banana mixture and then added the flour mixture and they turned out totally fine. If you are a real stickler, do it in parts, it's up to you. But don't worry if you don't, they'll still taste good!

Next, scoop them into cupcake liners. The recipe says use a "generous" 1/4 cup, but I (of course!) use my trusty ice cream scooper. Twice I've made these (I made them for Easter this weekend too) and both times I've had a little extra batter after scooping 12 cupcakes. So, I greased a ramekin and made a little cake just for me (okay, and for Ryan). But you could probably just make 14 cupcakes instead.

Bake at 350F for 20 minutes. Let cool completely on a wire rack.

You can definitely eat these without frosting if you want to make them as muffins rather than cupcakes. But if you wanna kick it up a notch -- it's time for the good stuff:
Peanut Butter Frosting
1/2 cup smooth peanut butter (Don't use the freshly ground or all natural kind. This is the time to go for the kind with all the preservatives and such!)
1 stick (1/2 cup) unsalted butter at room temperature
1 8-ounce package cream cheese at room temperate
1 1/2 cup powdered sugar
Mix the cream cheese, peanut butter and butter until smooth. Add in the powdered sugar and beat until light and fluffy.

Of course, this makes a lot of frosting, so save the extra for next time. :) Frost away, and top with chopped salted peanuts or cashews.
Dig in or pack a few up to take to YOUR work friends, if you like them enough to share!

Monday, April 5, 2010
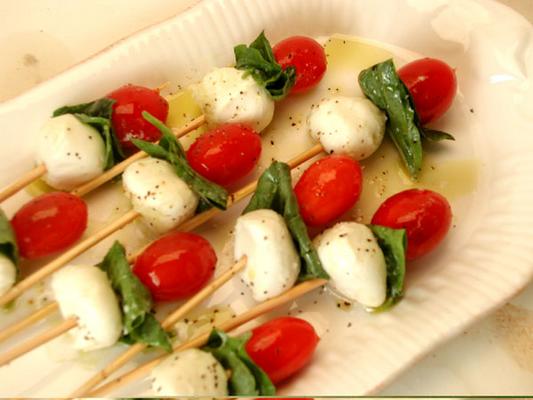
Caprese Salad (Tomato & Mozarella Salad)
I think my favorite thing to order at an Italian restaurant is the Caprese salad. It's hard to mess up and usually tastes amazing. I like to punch mine up by making an easy balsamic glaze, instead of using regular vinegar.
First, start by buying some good mozzarella. Now is not the time to save pennies by using the prepackaged kind next to the Kraft cheddar cheese. I always go to the specialty cheese case and get the kind packaged in water. But if you do buy the kind packaged in water, make sure to use it within a few days of opening, as the water will turn sour and then your cheese will taste yucky (trust me, this happened to me one time and I had to throw a big chunk of mozzarella into the trash!). Lately, I've been buying the mozzarella logs which are really yummy, and usually a little cheaper than the kind in the water (sometimes they even come pre-sliced!).
Next, slice a few large tomatoes. Usually I eat this salad with a light dinner, so I do large portions of one tomato per person.
To make the balsamic glaze is really simple. Put some balsamic vinegar (I would say maybe a cup to start with) in a small frying pan and let simmer over medium-low heat for 10-15 minutes.

Do not, I repeat, DO NOT put your face directly over the pan to smell while it's boiling. You'll get a really strong whiff of vinegar that will probably knock you off your feet. Keep a close eye on it, you want to take it off the heat once it starts to thicken. I judge this by seeing if it'll coat the back of a spoon.
 Once it's thick enough (don't let it get TOO thick though!), let it cool for awhile. You don't want to blemish your tomatoes with this hot glaze.
Make your stacks of tomatoes and mozzarella. If you have basil, use it. Sometimes I do, sometimes I don't. It's definitely not the end of the world if you don't use it. Always make sure to salt & pepper the tomatoes before adding the mozzarella. If you want to be fancier, feel free. Or, if you want to make these as appetizers for a party, get short skewers, cherry tomatoes and the little small mozzarella balls and thread them onto the skewers, putting a small piece of basil in between each one. See this as an example of the skewers.

After the glaze has cooled, drizzle over your stacks (or skewers). Drizzle a little olive oil over them too.

Then, dig in!
First, start by buying some good mozzarella. Now is not the time to save pennies by using the prepackaged kind next to the Kraft cheddar cheese. I always go to the specialty cheese case and get the kind packaged in water. But if you do buy the kind packaged in water, make sure to use it within a few days of opening, as the water will turn sour and then your cheese will taste yucky (trust me, this happened to me one time and I had to throw a big chunk of mozzarella into the trash!). Lately, I've been buying the mozzarella logs which are really yummy, and usually a little cheaper than the kind in the water (sometimes they even come pre-sliced!).
Next, slice a few large tomatoes. Usually I eat this salad with a light dinner, so I do large portions of one tomato per person.
To make the balsamic glaze is really simple. Put some balsamic vinegar (I would say maybe a cup to start with) in a small frying pan and let simmer over medium-low heat for 10-15 minutes.

Do not, I repeat, DO NOT put your face directly over the pan to smell while it's boiling. You'll get a really strong whiff of vinegar that will probably knock you off your feet. Keep a close eye on it, you want to take it off the heat once it starts to thicken. I judge this by seeing if it'll coat the back of a spoon.

Make your stacks of tomatoes and mozzarella. If you have basil, use it. Sometimes I do, sometimes I don't. It's definitely not the end of the world if you don't use it. Always make sure to salt & pepper the tomatoes before adding the mozzarella. If you want to be fancier, feel free. Or, if you want to make these as appetizers for a party, get short skewers, cherry tomatoes and the little small mozzarella balls and thread them onto the skewers, putting a small piece of basil in between each one. See this as an example of the skewers.

After the glaze has cooled, drizzle over your stacks (or skewers). Drizzle a little olive oil over them too.

Then, dig in!
Saturday, April 3, 2010
Pesto
I love pesto. I am obsessed with it. I will eat it with a spoon. Luckily, it's super easy to make, and all you need is a food processor.
Pesto
3 large cloves garlic, peeled
20 fresh basil leaves
1 1/4 cup grated parmesean cheese (I find the best to use is Kraft from the pasta aisle)
2/3 cup pine nuts (look in the produce section for these and store in the freezer)
1 teaspoon salt
1 cup olive oil
Start by putting the garlic, basil, cheese, pine nuts and salt in the food processor and mixing until a paste is formed.

Slowly drizzle oil in with processor running until mixed completely. Let sit at room temperature a few hours to let the flavors meld.

Enjoy with pasta, mix with mayo to make a pesto mayonnaise, or just eat with a spoon like me. :)

Friday, April 2, 2010
Friday Happy Hour: Pomegranate Blossom
TGIF!
 Today's cocktail is from the Social in Hollywood, California. My friend Jennifer sent me a few cocktails to test out, and this one is definitely a keeper!
Pomegranate Blossom
1 tablespoon simple syrup (Revisit my margarita post for a reminder on how to make simple syrup!)
2 ounces citrus-flavored vodka
1 ounce pomegranate juice (look in the section with the orange juice for this)
1/2 lemon juice

Pomegranate Blossom
1 tablespoon simple syrup (Revisit my margarita post for a reminder on how to make simple syrup!)
2 ounces citrus-flavored vodka
1 ounce pomegranate juice (look in the section with the orange juice for this)
1/2 lemon juice
Mix all ingredients in a cocktail shaker and strain into a martini glass. Garnish with a lemon slice and enjoy!

Thursday, April 1, 2010
Andes Mint Brownies

So EVERYBODY loves a brownie, right? And who doesn't love those little Andes mints you get after dinner at a fancy restaurant?? This recipe combines the best of both worlds. I found the recipe on the My Baking Addiction blog, but it definitely needed some adjustments.
So if you want to cheat (a la Aunt Sandy's Semi-Homemade), don't make the brownies from scratch and just buy the boxed brownie mix. Make according to directions, bake in a 8" or 9" square pan, lined with foil, foil sprayed heavily with Pam, and let cool completely. Then start the recipe at the green mint section.
Andes Mint Brownies
Brownies:
1/2 cup unsalted butter, cut into pieces
4 ounces unsweetened chocolate, coarsely chopped
1 1/4 cups granulated white sugar
1 teaspoon pure vanilla extract
2 large eggs
1/2 cup all purpose flour
1/4 teaspoon salt
First, line your square pan with aluminum foil (up the sides too) and Pam the foil like it's your day job. I made the mistake of not Pamming the foil, and it was a real bitch to get the foil off the brownies at the end of it all. It's easiest to use two longer sheets to get the the foil up the sides.

In a double-boiler, melt the chocolate and butter.

Take off the heat, and add in the sugar and vanilla.

Add in eggs, one at a time, stirring well after each one.

Stir in the flour and salt.

Bake at 325F for 20-25 minutes. (Less if you want chewier brownies!)

Let cool completely in the pan.

Next, you want to make the minty topping:)
Mint Topping
2 tablespoons unsalted butter, at room temperature
1 cup powdered sugar
1 – 1 1/2 tablespoons heavy cream
1/2 teaspoon pure peppermint extract
green food coloring
Mix all ingredients in your mixer until well mixed. Spread over the cooled brownies. Place in fridge 30 minutes or until minty mixture is set.

Chocolate Glaze
3 ounces semisweet chocolate
1 tablespoon heavy cream
Melt both in double boiler. Spread over minty layer. Note: The original recipe calls for butter, not cream, but when I made these with butter, and the chocolate firmed up, it got super hard. Then when I went to cut them the chocolate cracked and it was a TOTAL mess. They looked terrible and it was just bad. So, instead of using butter, if you use cream, the chocolate mixture won't harden all the way to cracking stage. It's totally up to you if you want to use the butter (1 tablespoon), but DON'T!! Use the cream. DO IT. OR ELSE. :) Also, I had to make a little extra chocolate because the amount above wasn't enough. It only covered about 2/3 of the top. So, maybe you should up it to 5 ounces to be on the safe side. (If you want to fancy these up a little, you can garnish the top with chopped Andes mints while the chocolate is still wet.)

So let the chocolate set for a few hours, I did mine in the fridge, as I mentioned before. Once the chocolate is set, get a cutting board, and flip the whole pan over on the board. Peel the foil off (this should be easier since you Pammed your foil, unlike me). Get a really big sharp knife, and cut the brownies. These are super rich (especially if you didn't cheat and made the brownies from scratch), so I cut my 8" pan into 16 brownies. But if you cut them smaller, it would probably be okay too.
Take these to work or a party, and I guarantee they'll be a hit! I made them for St Patrick's Day (thus the green), but they'll definitely work for ANY occasion. Enjoy!
Subscribe to:
Posts (Atom)